The American Psychological Association (APA) referencing technique outlines specific formatting and organization of student papers that an author can readily preserve in a template. Basically, this guide begins with a comprehensive description of Google Docs and highlights its utility to students. Then, the manual explains the method for accessing the ready Google Docs APA template. Next, the guide provides step-by-step instructions for manually creating an APA format template in Google Docs, essential for students aiming to create a 3 part thesis statement example. In turn, this manual discusses the making of an APA format template in two major stages: setting up the major sections of the template and covering elements that affect the entire paper.
Google Docs
Google Docs is a word-processing program that runs on an online platform with a high level of integration with other Google services and products. Basically, students use Google Docs to create text documents that require special formatting and organization, for example, an APA format essay. In this case, Google Docs users can use the software on Google Chrome. Also, Google Docs works on other browsers, but the user must first sign in to his or her Google account. Then, instructors encourage students to use Google Docs because it offers a permanent solution to the risk of losing saved assignments, which is a significant problem when using word processors that save documents in the laptop’s hardware. Besides, Google Docs updates all changes made to an assignment file in near real-time and preserves it in Google Drive, which makes an individual’s work accessible regardless of the device.

Ready APA Format Template in Google Docs
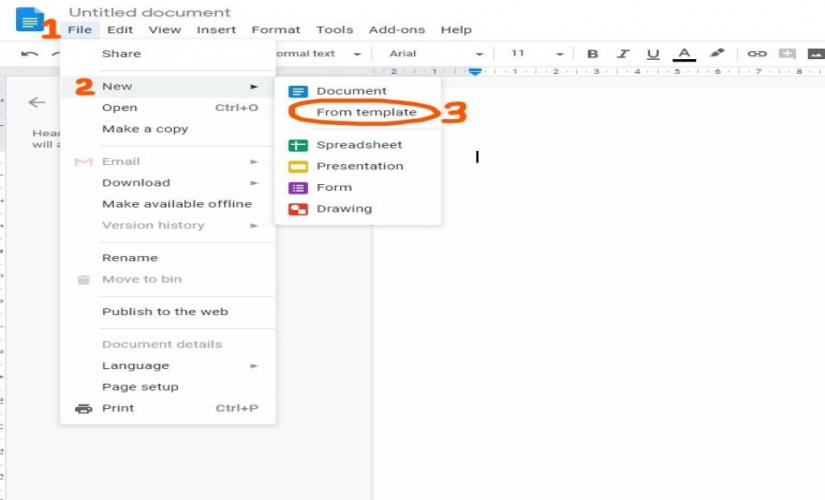
Google Docs comes with several ready templates, which include an APA format template. On a blank document, students navigate to the “File” tab (marker 1; see figure 1). After clicking the “File” tab, select “New” on the dropdown menu (marker 2). Then, click on “From template” on the dropdown menu that appears on the right of “New” (marker 3). The “Template gallery” opens up on a separate window. In the “Template gallery,” scroll to the “Education” section that contains the APA template under the name “Report: APA.”
Figure 1
Navigating to the “Template gallery”
Setting Up Major Sections of an APA Format Template in Google Docs
1. Title Page
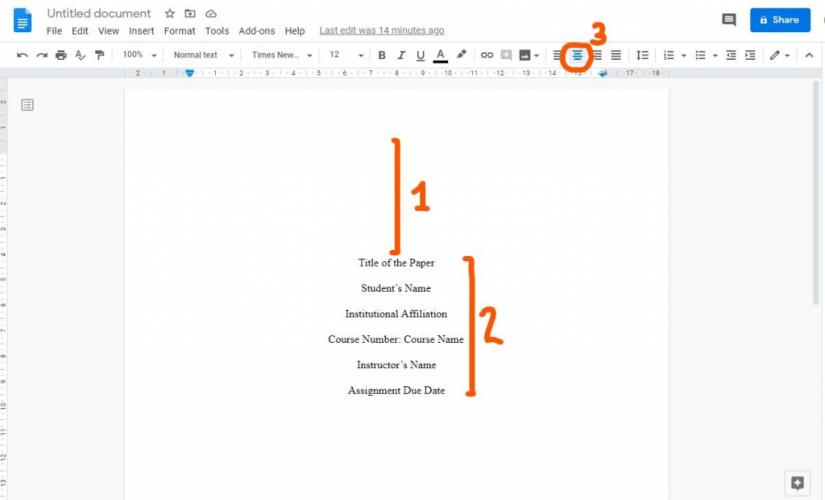
The APA referencing style has a fixed title page for student papers. Basically, students press the enter key on the keyboard to create blank spaces. In this case, the blank space is composed of at least two blank lines, but no more than five blank lines (marker 1; see figure 2). After the four-line space, an author writes the title of the paper, his or her names, the name of the institution that he or she attends, the course number and name, the instructor’s name, and the due date or submission date (marker 2). Also, students write each of these details on separate lines. Finally, the author centers elements of the title page using the centering functionality (marker 3).
Figure 2
Elements and Organisation of the Title Page
2. Abstract
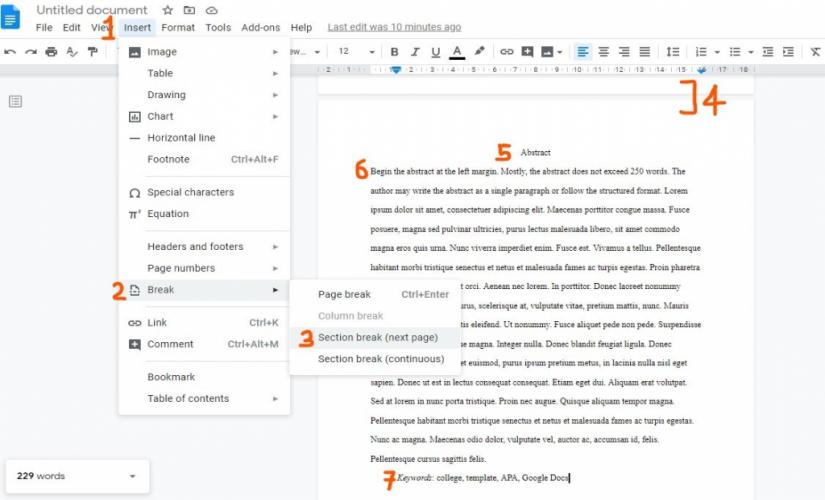
Immediately after the date on the title page, students should jump to the next page through the creation of a section break (marker 4; see figure 3). Basically, authors create the section break by clicking on the “Insert” tab and navigating to the “Break” section in the dropdown menu, as shown by markers 1 and 2. Also, writers select the “Section break (next page)” option in the “Break” dropdown menu (marker 3). In this case, students center the title of the abstract page, “Abstract,” at the top of the page (marker 5). Besides, when creating an APA format template in Google Docs, the abstract begins with no indentation (marker 6). Then, the keywords appear after the last line of the abstract with half an inch indentation from the left margin. In turn, a colon follows the phrase “Keywords,” which authors italicize, as shown by marker 7.
Figure 3
Developing an Abstract
3. Title of the Paper
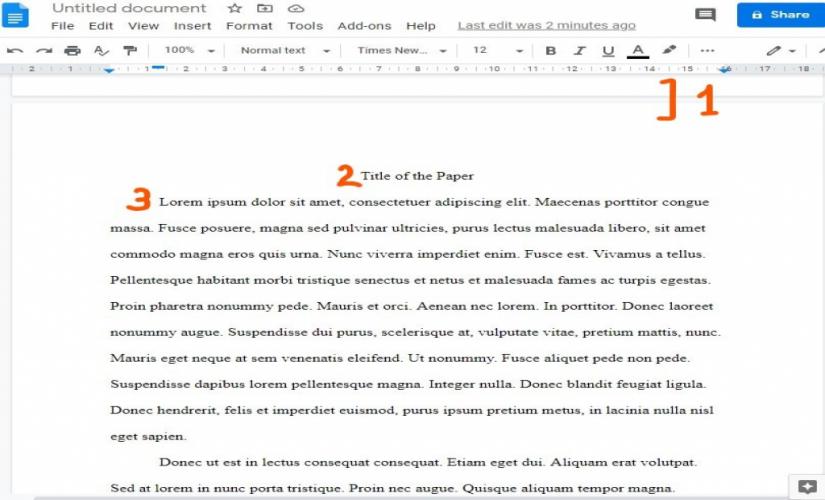
All essays or research papers in APA begin on a new page, which requires the insertion of a section break using the technique described in the previous section (marker 1; see figure 4). In this case, authors write full titles of their papers at the top of the new page (marker 2). Besides, students use title case styling and center the title (marker 2). Then, scholars write their essays on a new line, with no spaces between the title and first line (marker 3). In turn, the essay text aligns with the left margin of the paper.
Figure 4
Formatting the Title and Essay Text
4. References Page
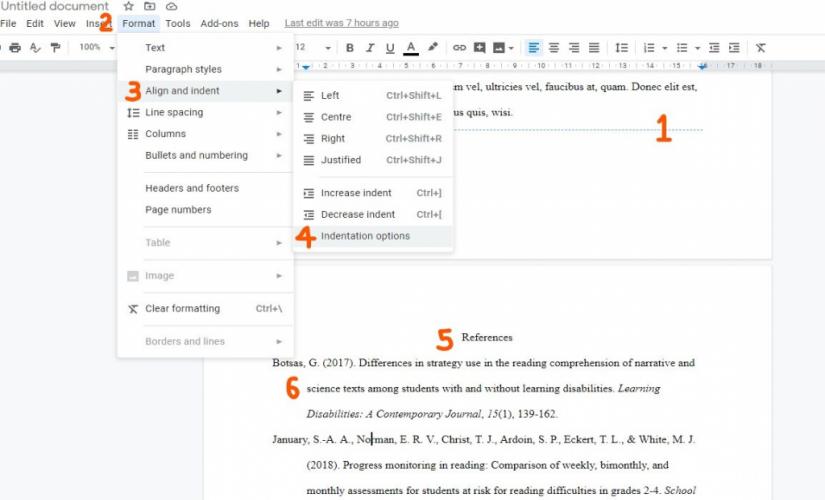
After the final word of the essay, students place a section break to move to the next page (marker 1; see figure 5). In this case, authors create the section break using the procedure in figure 3. Moreover, the title of the reference page, “References,” appears at the top of the new page (marker 5). On the next line, students write their first citation, covering the rules of organizing an APA format template in Google Docs. Then, each reference list entry exists in its paragraph, which has a hanging indentation (marker 6). In turn, students click on the “Format” tab (marker 2) and select the “Align and indent” option (marker 3) to reveal a dropdown menu that contains the “Indentation options” functionality (marker 4). Upon clicking the “Indentation options,” a new window opens, which allows authors to select “hanging” under the “special indentation” section and set the indentation distance to 0.5 inches.
Figure 5
Setting up the Reference Page
Setting Up APA Format Elements That Affect the Entire Paper Template in Google Docs
1. Headers
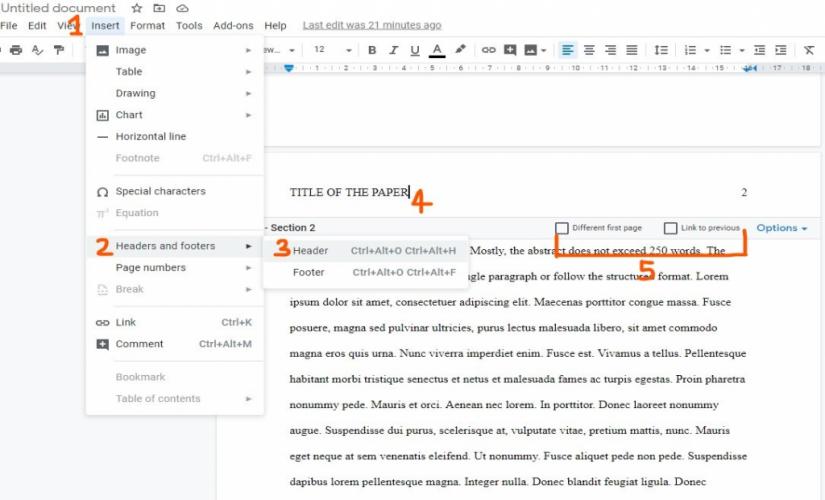
Students click the “Insert” tab while the cursor is somewhere on the text of the page (marker 1; see figure 6). Under the “Insert” dropdown menu, writers select the “Headers and footers” option (marker 2), which allows them to select the “Header” (marker 3). In this case, the header section appears at the top of the page with the cursor aligned with the left margin. Also, authors write a shortened title of the paper, which should not exceed 50 characters (marker 4).
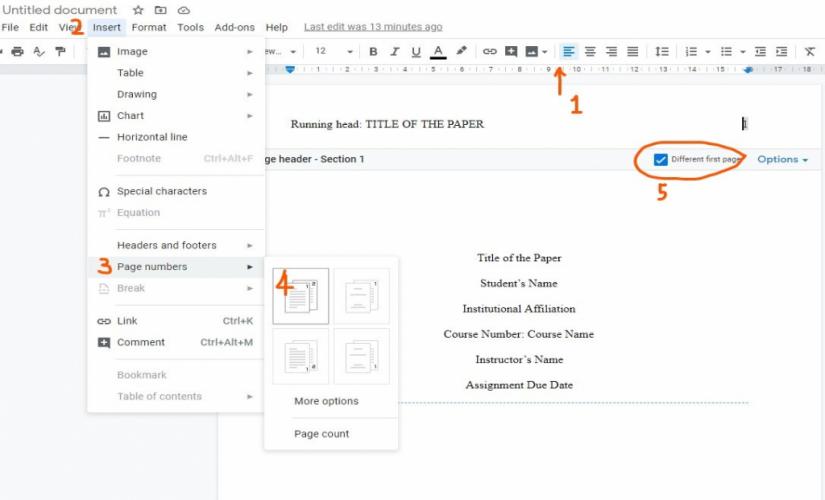
First and Second Page Header Differences. On the first page, the phrase “Running head:” precedes the shortened title, which makes its header different from the rest of the page, as shown in figure 7. Consequently, students check the “Different first page” box for the first page, as illustrated by marker 5 in figure 7. On the second page, authors do not check the “Different first page” and “Link to previous” boxes (marker 5; see figure 6).
Figure 6
Creating the Header
2. Page Numbers
Students access the tab-stop function by right-clicking the ruler, which opens a menu that contains the “Add right tab-stop” option (marker 1; see figure 7). After activating the right tab-stop, a triangle appears on the ruler, and authors drag the triangle towards the right until it aligns with the blue triangle on the right edge of the ruler. Once the cursor is correctly aligned with the right margin using the tab key, students click the “Insert” tab to expose a dropdown menu (marker 2). Then, scholars click the “Page numbers” section (marker 3), which displays various options for page number styling. In turn, writers select the page number style, where the numbering begins from the first page, and the number takes the top-right position on the paper (marker 4).
Figure 7
Inserting the Page Number
3. Fonts
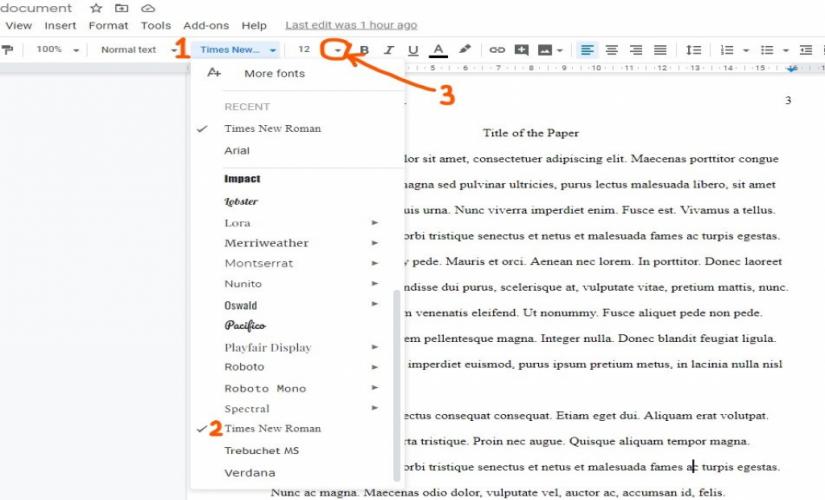
Students click on the dropdown arrow of the font tab on the toolbar (marker 1; see figure 8). In this case, a list of different fonts appears, and authors select the preferred font by scrolling down the list (marker 2). Finally, scholars adjust the font size by clicking the font size dropdown arrow on the toolbar (marker 3). Mostly, APA format papers use 12-point Times New Roman and 11-point Arial in Google Docs, although writers may use other san serif and serif fonts.
Figure 8
Choosing the Font and Setting Font Size
4. Margins
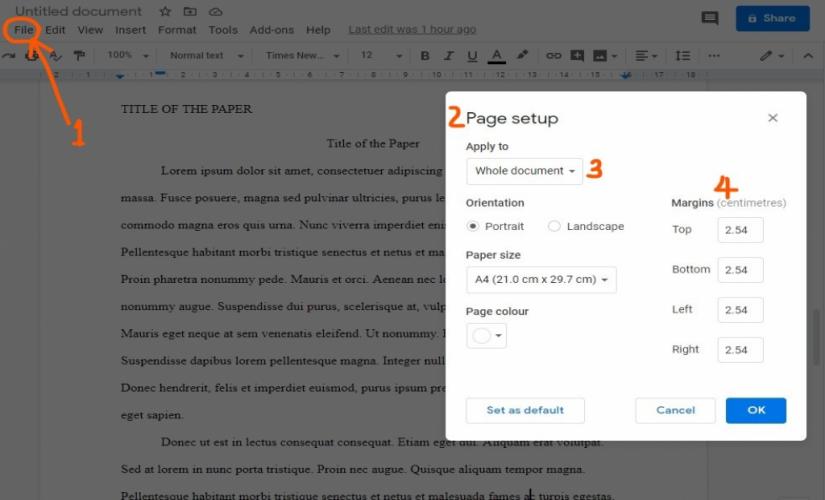
Students click on the “File” tab on the toolbar, which reveals a dropdown menu with the “Page setup” option (marker 1; see figure 9). After selecting the “Page setup” option, a new window pops up on the screen (marker 2). In this case, authors change the “Apply to” section to “Whole document” (marker 3). Finally, scholars set the margins to 2.57 centimeters, which is equivalent to one inch (marker 4).
Figure 9
Setting One Inch Margins
5. Indentation
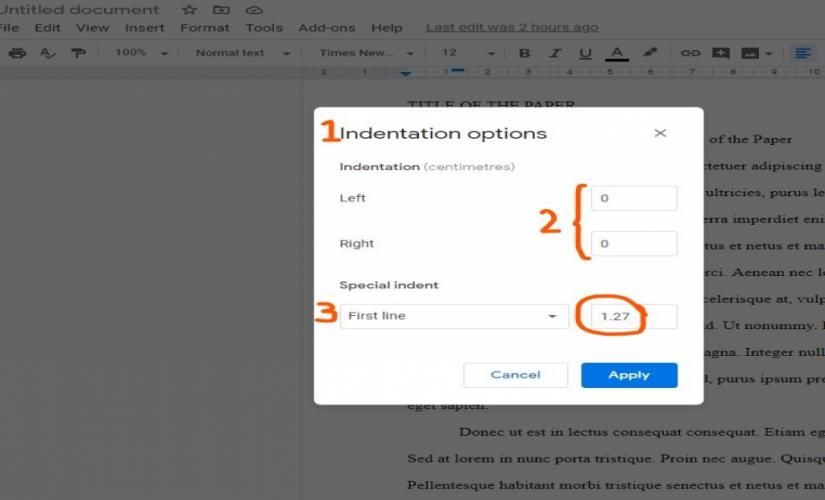
Scholars navigate to the “Indentation options” using the steps illustrated in figure 5. On clicking the “Indentation options” section, a new tab opens, which allows users to customize the indentation settings (marker 1; see figure 10). In this case, APA style does not require any indentation of standard body text, which implies that students set the indentation distance to zero (marker 2). However, the first line of each paragraph requires a half-inch indentation in Google Docs. Hence, authors select “First Line” under the special indent section and set the indentation distance to 1.27 cm (marker 3).
Figure 10
Half Inch Indentation for Body Paragraphs
6. Spacing
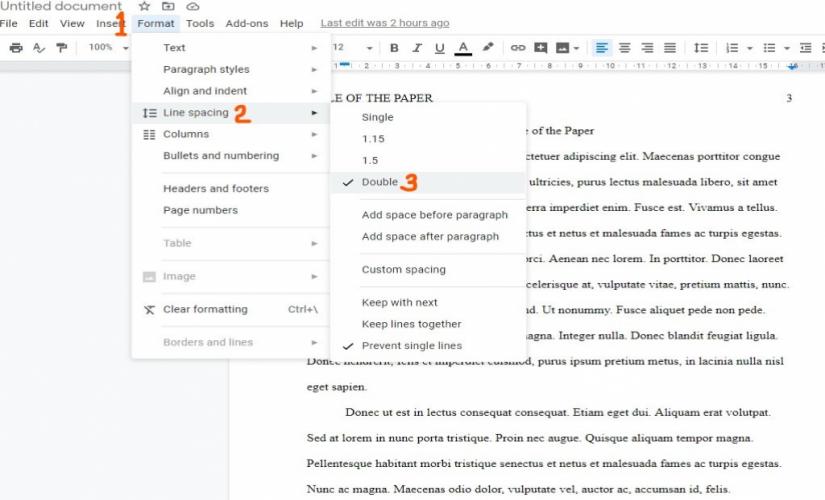
Authors click on the “Format” tab (marker 1), which opens a menu that contains a “Line spacing option” (marker 2; see figure 11). In this case, the “Line spacing” option provides writers with a variety of spacing options. Moreover, students click on the appropriate spacing, which instructors typically provide in assignment instructions (marker 3).
Figure 11
Line Spacing
Saving APA Format Template in Google Docs
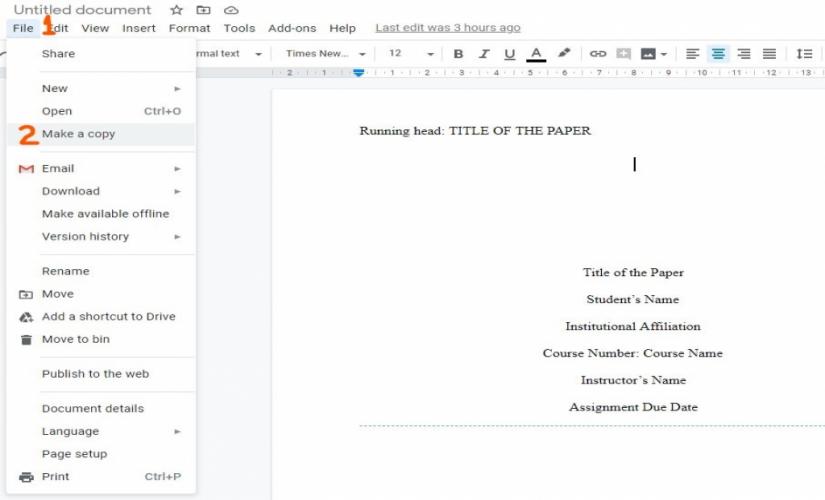
The free version of Google Docs does not allow users to create their APA format templates. Nonetheless, a student may create this template and save it as an ordinary document, which he or she may reuse when necessary. In particular, scholars open the original template file and click on the “File” tab, which generates a dropdown menu (marker 1; see figure 12). Then, students click on the “Make a copy” option (marker 2), which preserves the integrity of the original template and creates a new document that authors may use for an assignment.
Figure 12
Opening a Copy of the Template
Takeaways
- A ready APA format template in Google Docs saves students from the hustle of last-minute formatting, which may result in errors and penalties.
- It is good practice to create the title page, abstract, first page of the essay, and reference before other elements because they have unique formatting requirements.

