
The Modern Language Association (MLA) style has specific guidelines that regulate the formatting of essays for purposes of consistency in the appearance of texts. Basically, a format template in Google Docs is an ideal way of capturing most of the formatting guidelines without the need to rely on the MLA manual heavily. Consequently, this guide focuses on the use of MLA templates in Google Docs. Then, the guide opens with a detailed description of Google Docs and its value to learners. Also, this manual explains the fundamentals of working with ready MLA templates. In turn, the guide provided a step by step instructions for the manual creation of an MLA format template in Google Docs.
MLA 9 Format in Google Docs
Google Docs is a word processor made for use in the online environment. In this case, students utilize multiple functionalities of Google Docs to complete typed assignments that require specialized formatting in MLA 9. Basically, Google Docs can work on any web browser application if users log in to their Google accounts via different browsers. Nonetheless, Google Chrome is the ideal browser because of its high compatibility with other Google applications, for instance, Google Drive. Then, Google Docs allows students to access their documents even in situations where they do not have their laptops because of its integration with Google Drive. Also, Google Docs provides an alternative to commercial word processors because it has nearly all fundamental functionalities despite being free. In turn, students are quickly moving from standalone hardware-based word processors in the contemporary learning environment because Google Docs overcomes their major shortcomings in creating an MLA format template.

Ready MLA 9 Format Template in Google Docs
Google Docs contains a ready format template for MLA papers. Basically, students may access the template by clicking on the “File” tab, which reveals a dropdown menu (marker 1; see fig. 1). Next, scholars click on the “New” option (marker 2) on the menu to generate another dropdown menu that contains a “From template” option (marker 3). Then, the “Template gallery” opens in a separate window after clicking “From template” (marker 4). Moreover, students scroll down to the “Education” category (marker 5), which contains the ready template with the label “Report: MLA” (marker 6), an essential tool for formatting, akin to a rhetorical precis outline.
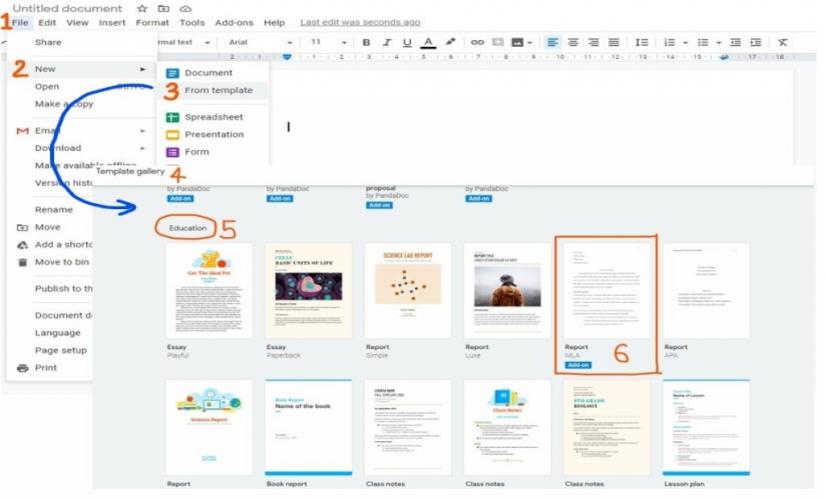
Fig. 1. Locating a ready MLA format template in Google Docs
Setting Up Major Sections of an MLA Format Template in Google Docs
1. Authorship Credentials
On a black document, students click the “Left align” shortcut on the toolbar (marker 1; see fig. 2). Basically, this action ensures that any text written on the document starts at the left margin. Then, scholars write their full names, the name of the instructor, the name of the course, and the date of submission. In this case, each of these details occupies separate lines (marker 2). Also, students should not change the arrangement of the components of the authorship credentials (marker 2).
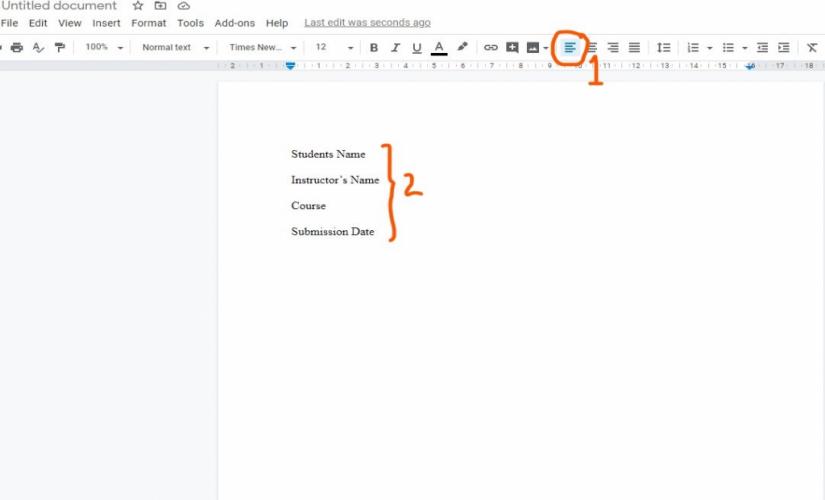
Fig. 2. The arrangement of authorship credentials.
2. Title of the Paper
Scholars press the enter key once, while the cursor is at the end of the “Submission Date” component to move to the next line (marker 1; see fig. 3). In this case, authors type the title of the paper and highlight it (marker 2). Then, students click the “Format” tab (marker 3), which opens a dropdown menu with an “Align and indent” section (marker 4). After clicking the “Align and indent” option, writers select the “Center” option (marker 5), which moves the title from its left margin alignment to the center of the page (marker 6). Finally, scholars use title case styling to guide the capitalization of the title of the paper.
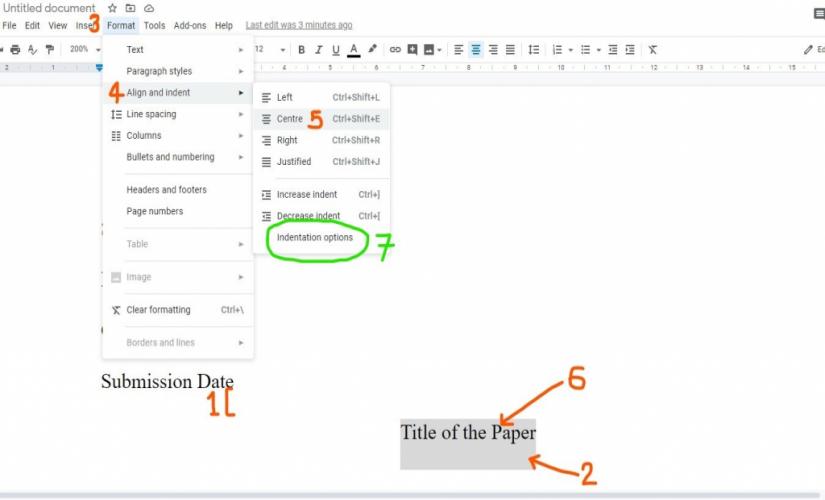
Fig. 3. Setting up the title of the paper.
3. Works Cited Page
After the last word of the essay, students insert a section break, which appears as a dotted line, to ensure that MLA Works Cited begins on a new page (marker 1; see fig. 4). Basically, the procedure for inserting a section break begins with a click on the “Insert” tab (marker 2), which reveals a dropdown menu that contains the “Break” option (marker 3). Then, authors click “Break” on the menu to generate another dropdown menu on its right, which has the “Section break (next page)” (marker 4). Moreover, scholars type the words “Works Cited” and center them at the top of the new page (marker 5). In turn, each Works Cited entry is a paragraph with hanging indentation (marker 6). Besides, the hanging indentation styling occurs under the “indentation options” function, as shown by marker 7 in figure 3.
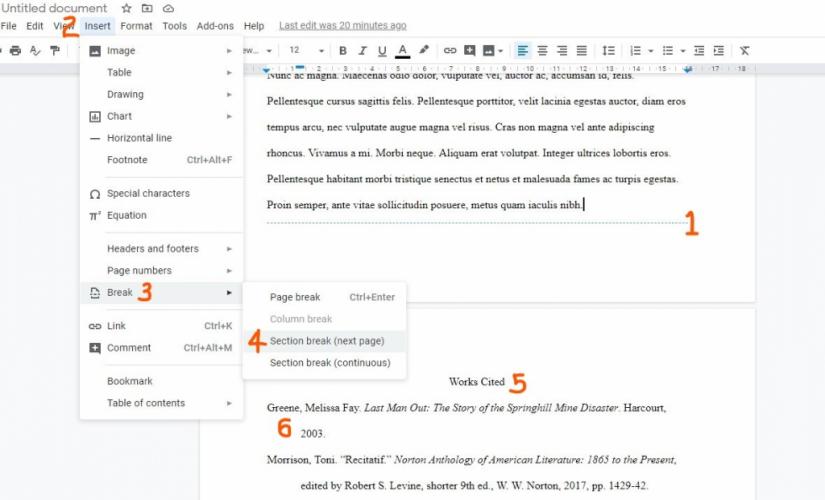
Fig. 4. Styling the MLA 9 Works Cited page.
Elements With Standardised Styling Throughout an MLA Format Template in Google Docs
1. Page Numbers
Authors double click the header area of the paper, which transfers the cursor from the essay text to the left margin of the header (marker 1; see fig. 5). Next, students click the “Right align” icon to move the cursor to the right margin of the header (marker 2). Besides, writers click the “Insert” tab to open the dropdown menu (marker 3), which contains the “Page numbers” section (marker 4). Finally, students choose the page number format that results in the inclusion of a page number on the upper right corner of the paper (marker 5). In turn, scholars should ensure that page numbers are Arabic numerals beginning from “1” on the first page of the paper.
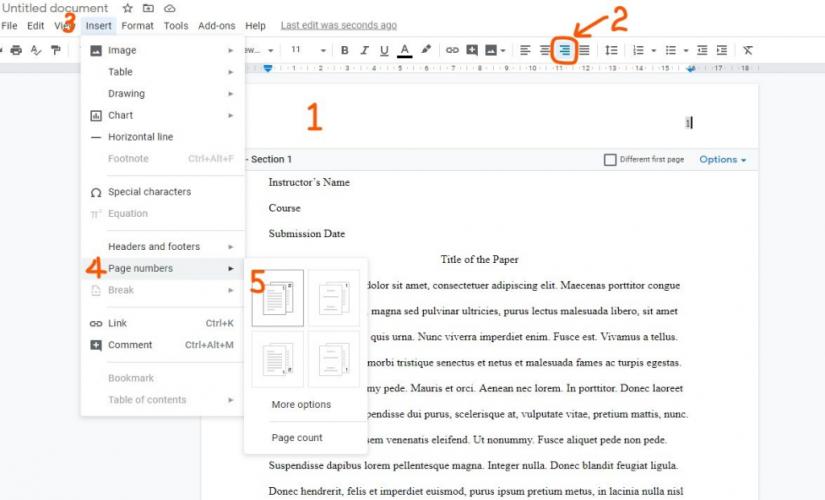
Fig. 5. Inserting page numbers.
2. Headers
After inserting page numbers, writers shift the cursor that lies on the right margin to the front of the page number (marker 1; see fig. 6). Subsequently, authors type the word “Surname,” which holds the position where their last name would appear in the header (marker 2). In turn, it is worth noting that there is a single space between the page number and the word “Surname.” Also, scholars should not check the “Different first page” (marker 3).
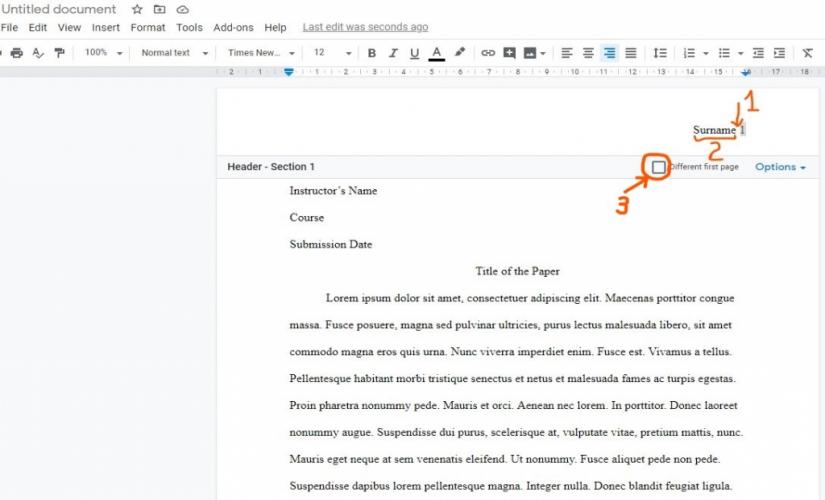
Fig. 6. Creating headers for an MLA format template in Google Docs.
3. Fonts
Before commencing the procedure for setting the font type and size, students should select all the content on the paper using the “Ctrl + A” keyboard shortcut. For example, writers click on the down arrow in the font tab on the toolbar, which presents a list of commonly used fonts (marker 1; see fig. 7). Then, authors select the “Times New Roman” font on the list (marker 2). In turn, MLA formatting guidelines do not identify a fixed font. However, it emphasizes that there should be a readily discernible difference between the regular type style and italics for any font type, which the author decides to use, including MLA format conclusion. As a result, scholars adjust the size of the letters by clicking the down arrow in the font size tab and choosing 12-point (marker 3).
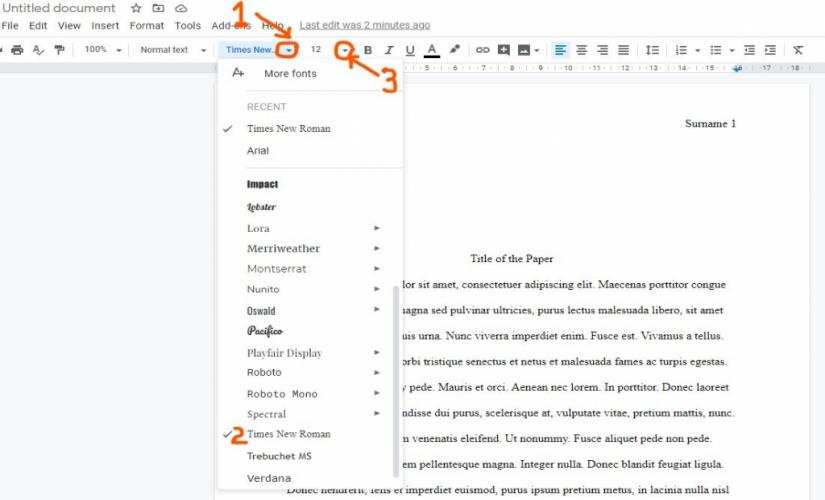
Fig. 7. Setting the font and font size.
4. Margins
The first action in the process of setting the margin length is to open the page setup window, which authors achieve by clicking on the “File” tab and navigate to the “Page setup” option (marker 1; see fig. 8). Upon clicking the “Page setup” option on the “File” tab’s dropdown menu, the page setup window appears in front of the text (marker 2). On the window, students choose “Whole document” in the “Apply to” segment (marker 3). Besides, scholars set the margin distance for the top, bottom, left, and right sides of the paper to 2.54 centimeters.
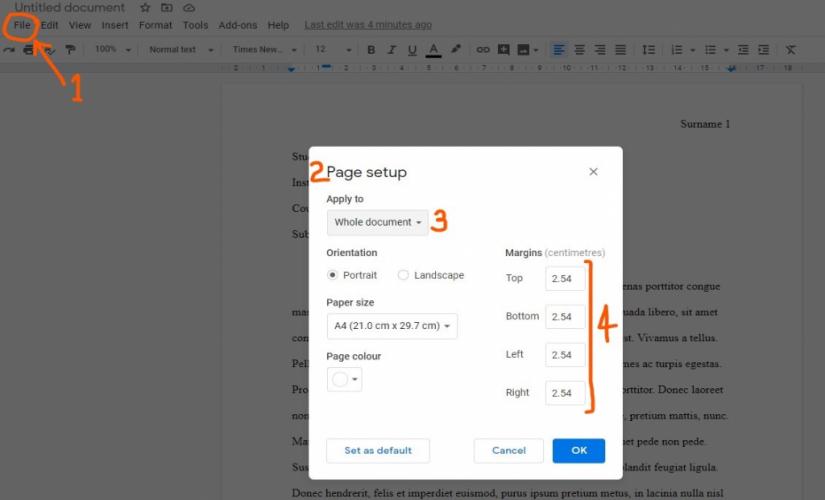
Fig. 8. Adjusting margins.
5. Spacing
Students use the “Ctrl + A” keyboard shortcut to select all the text in the document before starting the line space adjustment process. Firstly, authors click on the “Format” tab (marker 1) and pick the “Line spacing” option (marker 2; see fig. 9). In this case, the “Line spacing” option generates a dropdown menu on its right where scholars select the appropriate line spacing (marker 3). Typically, MLA uses double spacing, but students should ascertain that the convention agrees with the instructor’s technical requirements for the assignment. In turn, writers uncheck the “Add space before paragraph” and “Add space after paragraph” settings to eliminate unnecessary extra spacing between paragraphs (marker 4).
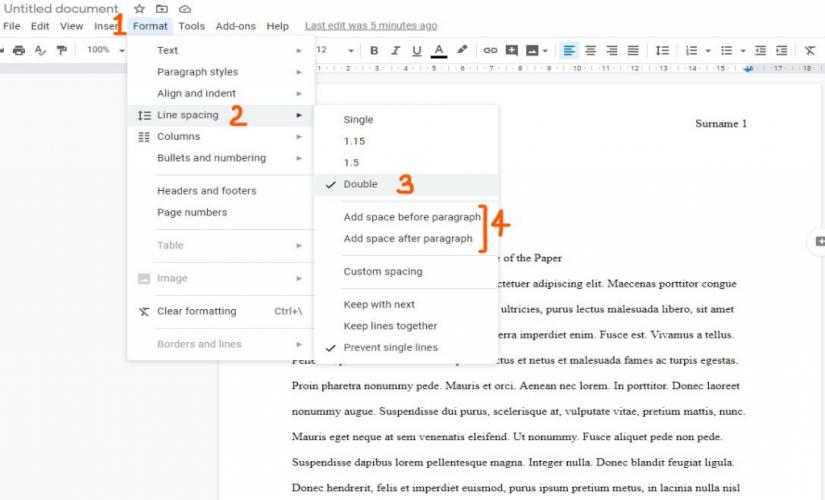
Fig. 9. Setting the appropriate line spacing.
6. Indentation
The “indentation options” window appears after students click on “Indentation options” under the “Align and indent” segment of the “Format” tab’s dropdown menu (see fig. 3). In this case, the “indentation options” window has two core aspects: “Indentation” and “Special indent” (marker 1; see fig. 10). In the “Indentation” section, writers set the left and right indentation distance to zero. Then, the “Special indent” feature allows authors to indent the first line of each body paragraph by 1.27 centimeters (markers 3 and 4).
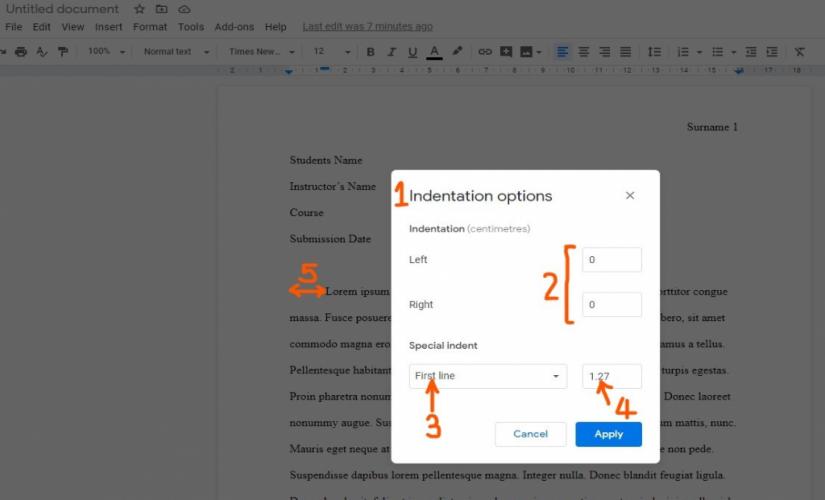
Fig. 10. Half inch indentation for body paragraphs.
Saving an MLA Format Template in Google Docs
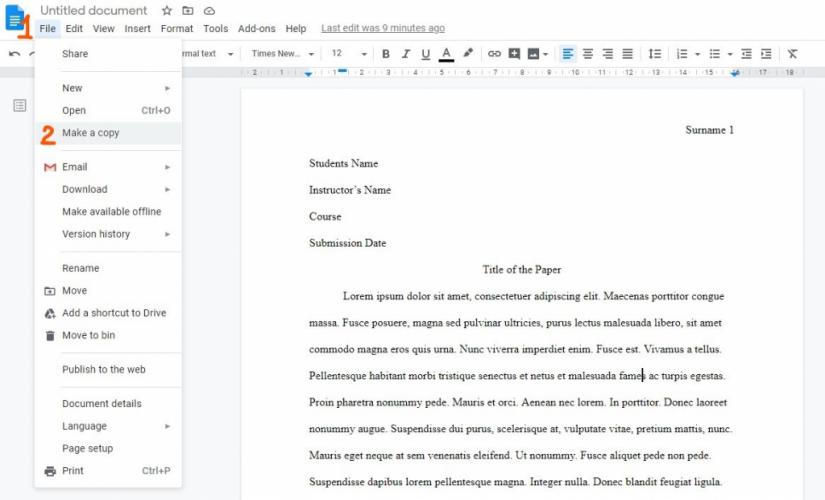
Google Docs does not allow a user with the standard free version of the application to save custom templates. However, authors may overcome this limitation by reusing an original MLA format template. After creating the template, writers should save the document. Later, scholars could retrieve the template for use by opening the document and clicking on the “Make a copy” option on the “File” tab’s dropdown menu (markers 1 and 2; see fig. 11). In turn, a copy of the original MLA format template will be opened in a separate window, which ensures the preservation of the formatting and styling of the original template.
Takeaways
- Students should make time to create custom templates for their MLA papers, which may reduce the time required to complete a paper by eliminating the time allocation for formatting.
- The presence of an MLA sample paper does not mean that students should not inspect the final draft’s formatting against the instructor’s instructions.
- It is advisable to start with the first and last pages during the process of creating a template because of their unique formatting demands.
- Writers must ensure that an MLA 9 format template in Google Docs is always up to date with changes that may occur to the MLA 9 manual.
- The creation of a personal MLA format template aids authors to internalize MLA 9 guidelines as compared to the reliance on ready templates.